
Hello, I am savory doenjang stew.
We will now learn about allowing FileZilla(https://filezilla-project.org) FTP server through firewall.
List (click to go to the corresponding article)
FileZilla Server Download and Installation
– Download
– Installation
FileZilla Server Settings
– Connect to Server
– Server Configure
FileZilla Server Allowing Firewall
– Accessing the Windows Defender firewall menu
– Allowing Windows Defender firewall
– Opening port 21 for FTP connection
Allowing firewall and port for external access to FileZilla FTP server
Accessing the Windows Defender Firewall menu

Type ‘Control Panel’ in the search bar.
If there is no search bar, press ‘Windows key + Q’ to bring up the search bar.

If ‘View by: Category’ is selected in the Control Panel, click on ‘System and Security’ and then click on ‘Windows Defender Firewall.

If ‘View by: Small icons’ or ‘View by: Large icons’ is selected in the Control Panel, click on ‘Windows Defender Firewall.
Allowing FileZilla FTP Server through Windows Defender Firewall

Click on ‘Allow an app or feature through Windows Defender Firewall’.
If a new window appears, click on ‘Change settings’, then click on the enabled ‘Allow another app’ button.

Click on Browse and navigate to the folder where filezilla-server is installed.
(By default, it should be located in C:\Program Files\FileZilla server.)
Double-click the ‘filezilla-server’ file and add it.
Then, allow other apps again and click on Browse. Double-click the ‘filezilla-server-gui’ file to add both files.

Check both Private and Public for the two added files on the right side of the list.
Firewalls operate separately for Private and Public settings. If you are not managing them separately, please check both.
Now, allow FileZilla program through the firewall.
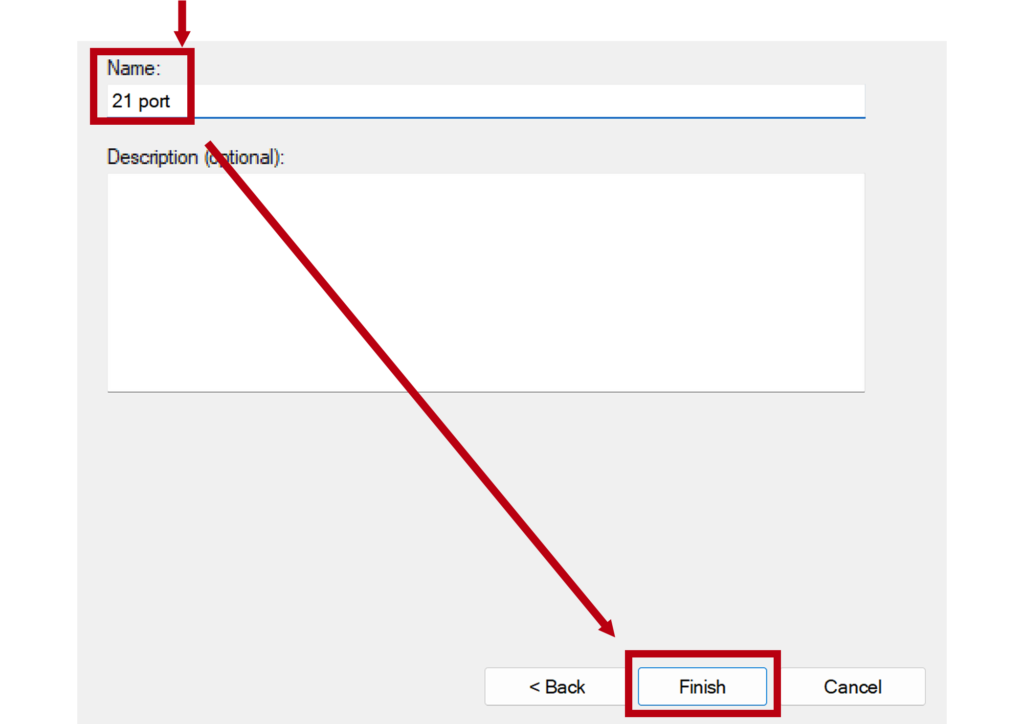
Opening Port 21 for FileZilla FTP Server

Let’s open port 21 for the FileZilla FTP server.
Click on “Advanced settings” on the left-hand side of the Windows Defender Firewall settings screen.
Click on “Inbound Rules” on the left-hand side of the Advanced Settings window, and then click “New Rule” on the right side of the window.


Follow these steps
Port -> TCP -> Enter specific local port “21”.
Allow the connection -> Allow for “Domain”, “Private”, and “Public” -> Enter a name of your choice and click Finish.”
The firewall and port permission settings are now complete.
You can now open the FTP server and connect to it using a client.
This post was written with sufficient testing at the time of creation, but please note that the content may vary depending on the policy of the developer.
Please use it for reference only.
(Environment used: Windows 11, Chrome, FileZilla Server 1.6.7)